Product documentation
Documentation
Guides for uploading, embedding, searching, and managing video.
Start here
Core workflows
Uploads, recording, and account settings.
Library and delivery
Organize and publish
Collections, channels, sharing, and portals.
Playback
Player and embeds
Customize the player and embed videos on your site.
Player
Built-in player with search, transcripts, subtitles, and speed controls.
Player Customization
Logos, colors, calls to action, and branded themes.
Player Integrations
WordPress, Squarespace, Wix, Kajabi, and other platforms.
Embedded Player
Embed single videos with iframe and playback parameters.
Embedded Collections
Embed a searchable video collection on your site.
Video Pages
Standalone pages with transcripts, chapters, and metadata.
Search and refinement
Search and editing
Find content and refine metadata.
Extensions
Integrations and support
Third-party integrations and common questions.
Add videos
Drag a file onto the grid. Or click Upload in the top-right.
Drag and drop
- Click and hold the file you want to upload
- Drag it onto the Skiv grid and drop it
Upload button
- On the top right, click the Upload button
- Select your file in the file explorer window and confirm
Record
Record your screen or camera straight into your library.
Record video or screen
- Click the Record button
- Choose what you want to record: Screen or Camera
- Provide the necessary browser permissions
- Preview your screen, then click Record to start recording
- To stop recording, click Stop
- Click Upload to start uploading
Account
Manage your profile, password, payment method, and plan.
Change username
- Click the user icon in the top-right, then Settings
- Edit the first line, under NAME
Change channel URL
- Click the user icon in the top-right, then Settings
- Edit the second line, under USERNAME, where it says Skiv/yourusername
Change password
- Click the user icon in the top-right, then Settings
- In the PASSWORD row, on the right, click Change
- Enter the current and new passwords
- Click Save
Reset password
- On Skiv, click Sign in
- In sign-in modal, click Forgot your password?
- Enter the email of the account
- Click Continue
- In your inbox, you will receive an email. In it, click Reset password
- Enter the new password
- Click Reset password
Add / change card
- Click the user icon in the top-right, then Settings
- On the sidebar, click Plan
- Under Payment method click Add new card
- Fill out the card details, and click Add card to submit
Delete your account
- Click the user icon in the top-right, then Settings
- On the sidebar, click Plan
- Click Delete
- Click Request deletion
- In your inbox, you will receive an email to confirm deletion. In it, click Permanently delete account
Stop auto-billing
- Click the user icon in the top-right, then Settings
- On the sidebar, click Plan
- Remove all cards / payment methods by hovering over each card and clicking the remove icon
Basic operations
Rename, download, share, and delete videos. Update visibility and subtitles.
Studio mode
Studio is where you manage every video and collection, regardless of visibility.
Switch to Studio from the user icon in the top-right.
Rename a video
- Select it
- In the bottom-bar, click Rename
- Enter the new name
- Click Save
Download a video
- Select it
- In the bottom-bar, click Download
Change visibility
- Select it
- In the bottom-bar, click Change visibility
- Select the desired option
Private: only the owner can view.
Hidden: only embedded, not visible on Skiv.
Unlisted: anyone with the link can view.
Password: anyone with the password can view.
Public: anyone can view.
Delete a video
- Select it
- In the bottom-bar, click Delete
- Confirm with Delete video
Add subtitles
- In the video page, click the menu icon
- Click Manage subtitles
- Click Upload subtitles and select the desired file
- Rename the subtitles to the correct language
Change cover/thumbnail
- In the video page, click the menu icon
- Click Change cover
- Upload an image, or enter a timestamp to use that frame as the cover (e.g. 0:20)
- Click Set cover
Portals
Branded subscription pages for your videos. Add tiers, set pricing, publish.
Create a Portal
- Open Monetize in the sidebar
- In the top-right, click Create new Portal
- Enter a name and description for the Portal
- Select the desired collection from the dropdown
- Click Create
Monetize Portals with subscriptions
- Open Portals in the sidebar
- Click the menu icon of the Portal you want to monetize
- Click Edit
- Click Add subscription
- Name the subscription tier - if left empty, the default will be "Tier 1"
- Set your monthly and yearly pricing - if left empty, this tier will be free by default. To not include monthly or yearly billing options, leave the corresponding field empty.
- Describe what the tier includes in the description box (optional)
- Click Create
- Click Save & Update
Edit a Portal
- Open Portals in the sidebar
- Click the menu icon of the Portal you want to edit
- Click Edit
- Click Add subscription
- Edit title, description, logo, or subscriptions
- Click Save & Update
Collections
Group videos into collections. Share them with anyone.
Create a collection
- Open Collections in the sidebar
- In the top-right, click New collection
- Enter the collection name
- Select desired visibility (default is Private)
- Click Create
Add videos
- Open Videos in the sidebar
- Select the videos you want to add
- In the bottom-bar, click Add to collection
- Click the collection you want to add the videos to
Change visibility
- Open Collections in the sidebar
- Click the Collection you want to make public or private
- Inside the collection, on the top-left next to the title, click the visibility icon
- Select the desired visibility
Private: only the owner can view.
Hidden: only embedded, not visible on Skiv.
Unlisted: anyone with the link can view.
Password: anyone with the password can view.
Public: anyone can view.
Note: collection visibility does not affect video or subcollection visibility. Example 1: you have an unlisted video in a public collection, the video will not be visible in the collection. Example 2: you have a public video in an unlisted collection, the video will be visible in the collection.
Create subcollection
- Go to collection in which you want to add a subcollection
- Click New collection in the topbar
- Give the new collection a name
- Select the desired visibility
- Click Create
Move subcollection
Click and drag collections and subcollections to reorder them.
- Click the collection you want to move
- Drag it over the collection you want to add it to
- When the destination collection is highlighted, drop it
Channel
Your channel gathers your public videos and collections in one place. Private, Unlisted, and Hidden videos stay off the channel.
Go to your channel
- When logged in, click the user icon to open the Account options dropdown
- Click Channel
Customize channel
- When in your Channel, click Edit channel in the top-right
- Click and edit the text field you want to edit
- Click Stop editing in the top-right
Set featured video
- When in your Channel, click Edit channel in the top-right
- Click and edit the featured video, where it says Change featured video
- Select the video you wish to set as featured, and click Set as featured video in the bottom-right of the modal
- Click Stop editing in the top-right
Immersive view
A fullscreen, cinematic layout for a collection. Share it with people who don't have a Skiv account.
Open immersive view
- Open Collections in the sidebar
- Click the Collection you want
- In the top-right, click Immersive view
Share immersive view
- Open Collections in the sidebar
- Click the Collection you want
- In the top-right, click Immersive view
- Copy the URL in the address bar. If the Collection isn't private, anyone with the link will be able to view it.
Search
Search inside your videos — by speech, faces, text, objects, or actions. Two modes:
- Keyword — exact matches. Filter by dimension with prefixes like
f:ford o:carto find Henry Ford next to a car. - Smart — free-form queries like "people holding hands" or "how hot is it on Mars?"
Smart search runs across your full library in Studio view. Enable it in Preferences first.
Search in all your videos
- Type the keywords into the search bar at the top of the page
The results will show up on the video grid.
Hover your mouse over the thumbnails to preview.
Search in a single video
- Open the video you want to search in
- In the top-right corner of the video, click Search
- Type the keywords into the search bar
- Click the highlighted moments in the timeline or use the navigation arrows to skip between results
The times at which the results appear will show up highlighted in the timeline.
Multimodal keyword search
- Type keywords in the search bar with filter prefixes. E.g.
f:musk o:car s:teslareturns videos with faces matching "musk", objects matching "car", and speech matching "tesla". Combine as many as needed.
Click the info icon next to the search bar to see all available filters.
Smart search
- Enable smart search on your account in Preferences.
- Wait for the initial indexing to complete. You will receive an email once it is done.
- Describe what you're looking for. Questions work too. E.g.
how hot is it on mars?, ormysterious lights.
Smart search can have visual and transcript matches. Click the info icon on the right-side of the search bar to toggle visual and transcript results.
Keyword search filters
Prefix a keyword with a modifier to scope the search to one category.
| Speech | s:keyword | Searches for words that are said in the video |
| Faces | f:keyword | Searches for people whose face appear in the video |
| Text | t:keyword | Searches for text that appears in the video |
| Objects | o:keyword | Searches for objects that are visible in the video |
| Actions | a:keyword | Searches for actions that are performed in the video |
| Sounds | z:keyword | Searches for sounds that can be heard in the video |
| Title | n:keyword | Searches for titles (names) of videos |
| Description | d:keyword | Searches for descriptions of videos |
Label & Edit
Label anything in a video. Edit anything Skiv labeled.
Speech
Edit transcript
- Open the video you want to edit
- In the panel on the right, go to the Speech tab
- On the bottom-right, click Edit
- Click the paragraph you want to edit, making it editable
- Type the text
- In the timeline under the video, move the handles to set the start and end times of the paragraph you have selected
- Click Done
Click the play-segment icon to preview the segment you have selected.
Use the spectrogram, film, and sound icons to switch between timeline styles.
Use your mouse's scrollwheel or use pinch to zoom in and out on the timeline.
Add to transcript
- Open the video you want to edit
- In the panel on the right, go to the Speech tab
- On the bottom-right, click Edit
- Use the timeline below the video to navigate to where you want to add a new paragraph
- Click Add
- Type the text
- In the timeline under the video, move the handles to set the start and end times of the new paragraph
- Click Done
Click the play-segment icon to preview the segment you have selected.
Use the spectrogram, film, and sound icons to switch between timeline styles.
Use your mouse's scrollwheel or use pinch to zoom in and out on the timeline.
People
Edit people
- Open the video you want to edit
- In the panel on the right, go to the People tab
- Click on any person's name and type to rename it
- Click Save
Found the same person multiple times? Give them the same name and they will be merged into one.
Hover over a picture and click the delete icon to remove that person from the list.
Objects
Label objects
- Open the video you want to edit
- In the panel on the right, go to the Objects tab
- On the bottom-right, click Edit
- Click-and-drag over the video to draw a box around the object you want to label
- Give the object a name by clicking the box header
- In the timeline under the video, move the handles to set when the object comes in and out of view
- Click Done
Click the play-segment icon to preview the segment you have selected.
Use the spectrogram, film, and sound icons to switch between timeline styles.
Use your mouse's scrollwheel or use pinch to zoom in and out on the timeline.
Edit an object label
- Open the video you want to edit
- In the panel on the right, go to the Objects tab
- On the bottom-right, click Edit
- In the panel on the right, click the name of the object you want to edit to navigate to the next time it shows up
- Rename the object by clicking the box header or resize its bounding-box by dragging its corners
- In the timeline under the video, move the handles to set when the object comes in and out of view
- Click Done
Click the play-segment icon to preview the segment you have selected.
Use the spectrogram, film, and sound icons to switch between timeline styles.
Use your mouse's scrollwheel or use pinch to zoom in and out on the timeline.
Text
Label text
- Open the video you want to edit
- In the panel on the right, go to the Text tab
- On the bottom-right, click Edit
- Click-and-drag over the video to draw a box around the text you want to label
- Give the text a name by clicking the box header
- In the timeline under the video, move the handles to set when the text comes in and out of view
- Click Done
Click the play-segment icon to preview the segment you have selected.
Use the spectrogram, film, and sound icons to switch between timeline styles.
Use your mouse's scrollwheel or use pinch to zoom in and out on the timeline.
Edit a text label
- Open the video you want to edit
- In the panel on the right, go to the Text tab
- On the bottom-right, click Edit
- In the panel on the right, click the preview of the text you want to edit to navigate to when it shows up
- Rename the text by clicking the box header or resize its bounding-box by dragging its corners
- In the timeline under the video, move the handles to set when the text comes in and out of view
- Click Done
Click the play-segment icon to preview the segment you have selected.
Use the spectrogram, film, and sound icons to switch between timeline styles.
Use your mouse's scrollwheel or use pinch to zoom in and out on the timeline.
Actions
Label actions
- Open the video you want to edit
- In the panel on the right, go to the Actions tab
- On the bottom-right, click Edit
- Click-and-drag over the video to draw a box around the action you want to label
- Give the action a name by clicking the box header
- In the timeline under the video, move the handles to set when the action starts and when it ends
- Click Done
Click the play-segment icon to preview the segment you have selected.
Use the spectrogram, film, and sound icons to switch between timeline styles.
Use your mouse's scrollwheel or use pinch to zoom in and out on the timeline.
Edit an action label
- Open the video you want to edit
- In the panel on the right, go to the Actions tab
- On the bottom-right, click Edit
- In the panel on the right, click the name of the action you want to edit to navigate to the next time it shows up
- Rename the action by clicking the box header or resize its bounding-box by dragging its corners
- In the timeline under the video, move the handles to set when the action starts and when it ends
- Click Done
Click the play-segment icon to preview the segment you have selected.
Use the spectrogram, film, and sound icons to switch between timeline styles.
Use your mouse's scrollwheel or use pinch to zoom in and out on the timeline.
Sounds
Label sounds
- Open the video you want to edit
- In the panel on the right, go to the Sounds tab
- On the bottom-right, click Edit
- Click Add
- Give the sound a name
- In the timeline under the video, move the handles to set when the sound starts and when it ends
- Click Done
Click the play-segment icon to preview the segment you have selected.
Use the spectrogram, film, and sound icons to switch between timeline styles.
Use your mouse's scrollwheel or use pinch to zoom in and out on the timeline.
Edit a sound label
- Open the video you want to edit
- In the panel on the right, go to the Sounds tab
- On the bottom-right, click Edit
- In the panel on the right, click the name of the sound you want to edit to navigate to the next time it can be heard
- Rename the sound by clicking its label at the bottom-left of the video
- In the timeline under the video, move the handles to set when the sound starts and when it ends
- Click Done
Click the play-segment icon to preview the segment you have selected.
Use the spectrogram, film, and sound icons to switch between timeline styles.
Use your mouse's scrollwheel or use pinch to zoom in and out on the timeline.
Cut clips
Pull highlight clips out of any video. Share the moments, not the full file.
Cut a clip from a video
- Open the video you want cut a clip from
- Under the bottom-right of the video, click the scissors icon
- In the timeline under the video, move the handles to set the start and end times of the new clip
- Set the clip's title, description, and visibility in the right panel
- Click Save
Click the play-segment icon to preview the segment you have selected.
Use the spectrogram, film, and sound icons to switch between timeline styles.
Use your mouse's scrollwheel or use pinch to zoom in and out on the timeline.
Player
HTML5 video player. 4K DASH/HLS streaming, Chromecast and AirPlay, in-video search, and responsive layout.
Video search
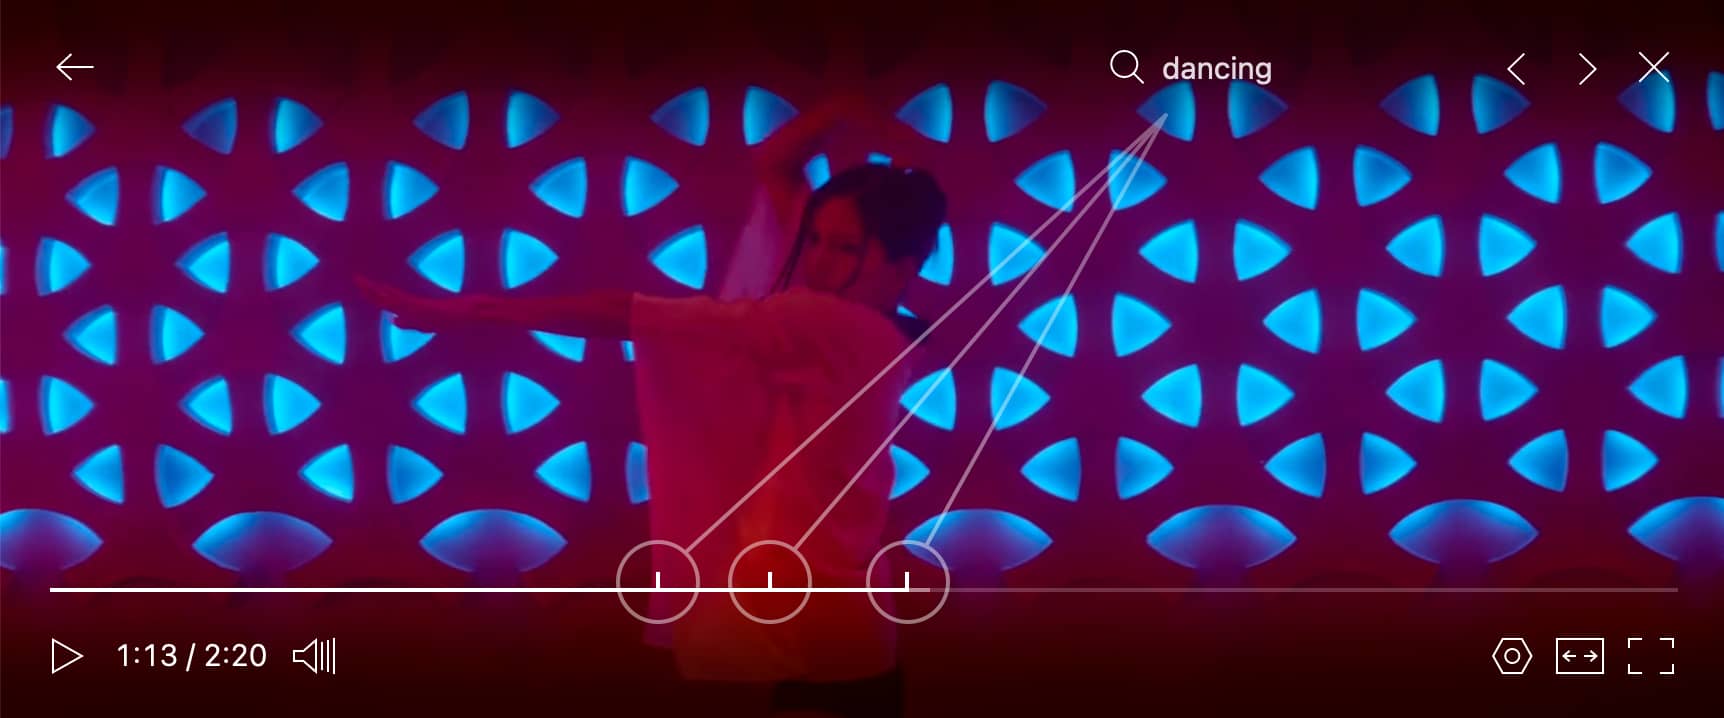
- Click Search at the top-right of the player
- Enter your query
- Results will show up on the timeline
- Click the result indicators, or on the navigation arrows, to navigate between results
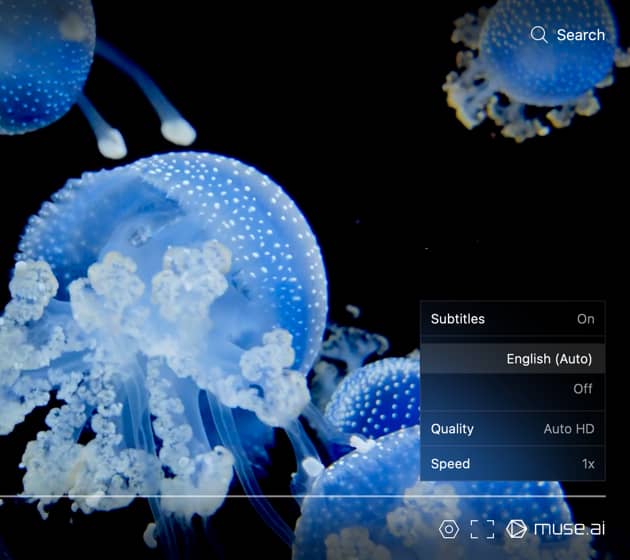
Subtitles
- Click the settings icon at the bottom-right of the player
- Click Subtitles and select the subtitles you want
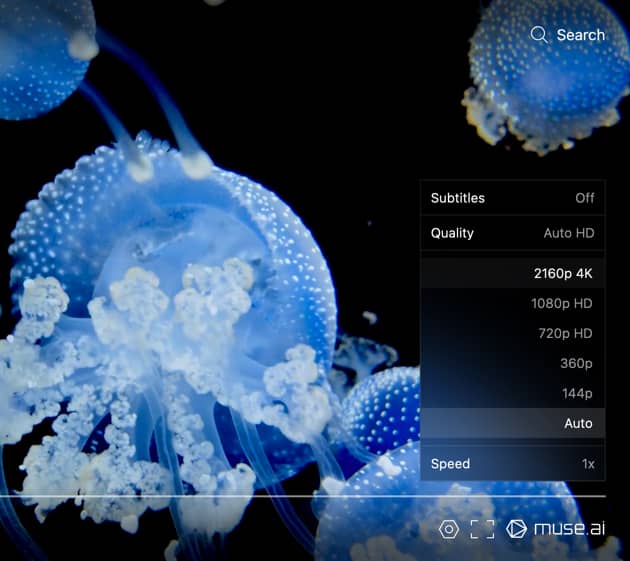
Video playback quality
- Click the settings icon at the bottom-right of the player
- Click Quality and select the resolution you want
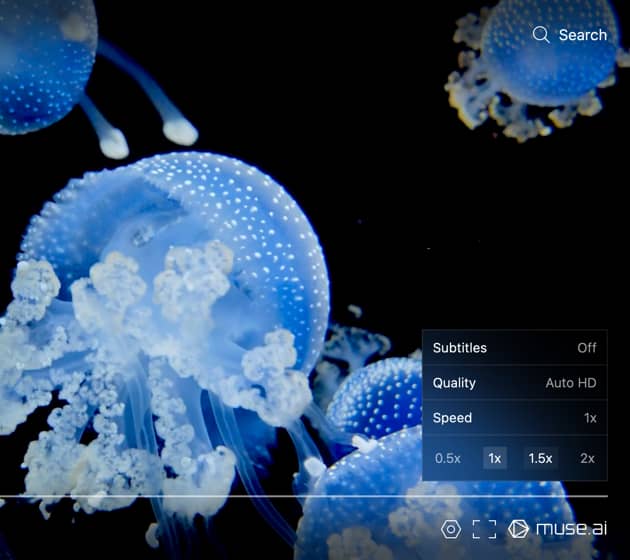
Video playback speed
- Click the settings icon at the bottom-right of the player
- Click Speed and select the speed you want
Chromecast / AirPlay
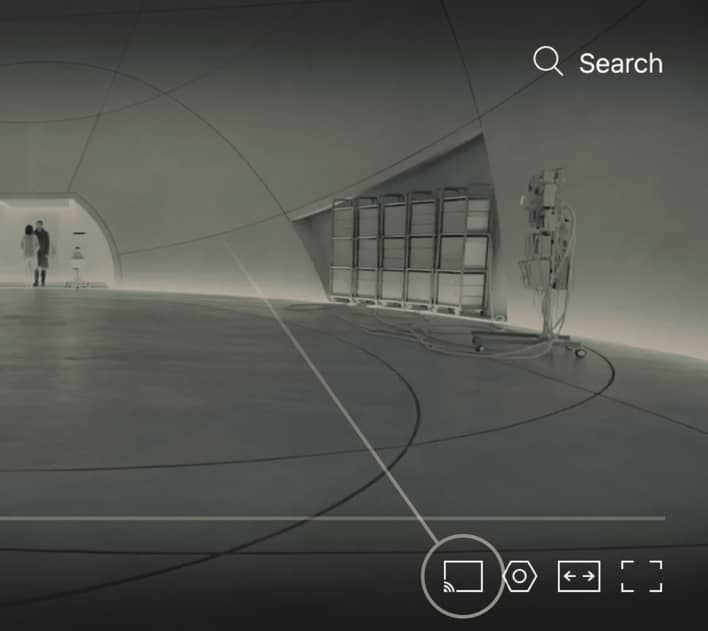
- Click the Chromecast or AirPlay icon in the bottom-right of the player
- Select the device to which you want to cast
Chromecast is only available on Chrome browsers, with a Chromecast device on the same WiFi network.
AirPlay is only available on Apple devices, with an AirPlay device on the same WiFi network.
Video chapters
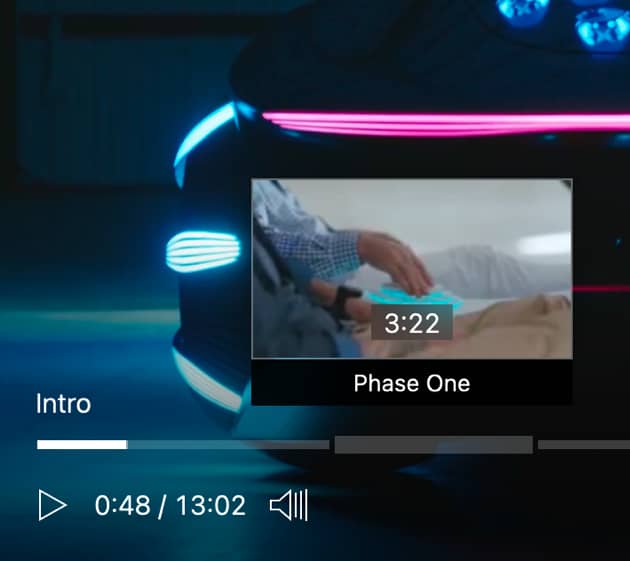
- Add chapters by typing the timestamps followed by chapter titles in the video description, one per line. Start with 0:00 and keep chapters at least 8 seconds long. For example:
0:00 Intro
3:05 Phase One
- Place your cursor over the timeline to preview the chapter names
- Click the timestamps to navigate to the beginning of each chapter
Keyboard controls
[space] / k | Play / Pause |
l | Skip 10 seconds |
j | Back 10 seconds |
. | Next frame |
, | Previous frame |
▶ | Skip 5 seconds |
◀ | Back 5 seconds |
▲ | Volume up |
▼ | Volume down |
f | Toggle fullscreen |
s | Focus search field |
Player customization
Style the player to match your site.
Built-in options cover the basics. For anything else, inject your own CSS:
- Use the JS or iframe methods.
- Customize the elements you wish to change using CSS.
-
For standard embed: Add a
data-cssattribute with your CSS to the player<div>.<div data-css="your_css_here" data-video="y8zH87z" class="skiv-video-player"></div> <script src="https://skiv.com/static/js/embed-player.min.js"></script>
For iframe embed: Add a
cssparameter to the iframe URL.<iframe src="https://skiv.com/embed/y8zH87z?css=your_css_here" width="576" height="324" frameborder="0" allowfullscreen></iframe>For JS embed: Place the CSS inside the
cssparameter.SkivPlayer({css: 'your_css_here', container: '#video-player', video: 'sLFaX4p'});
Examples:
Centered play button (JS)
<div id="video-player"></div>
<script src="https://skiv.com/static/js/embed-player.min.js"></script>
<script>
  SkivPlayer({
    container: '#video-player',
    video: 'sLFaX4p',
    style: 'minimal',
    logo: false,
    search: false,
    title: false,
    coverPlayPosition: 'center',
  });
</script>
Centered play button (iframe)
<iframe src="https://skiv.com/embed/sLFaX4p?logo=0&style=minimal&cover_play_position=center"
        width="576" height="324" frameborder="0" allowfullscreen></iframe>
Player with logo (JS)
<div id="video-player"></div>
<script src="https://skiv.com/static/js/embed-player.min.js"></script>
<script>
  SkivPlayer({
    container: '#video-player',
    video: 'sLFaX4p',
    logo: 'https://upload.wikimedia.org/wikipedia/commons/thumb/a/a3/NASA_Worm_logo.svg/2560px-NASA_Worm_logo.svg.png',
  });
</script>
Player with accent color + logo (JS)
<div id="video-player"></div>
<script src="https://skiv.com/static/js/embed-player.min.js"></script>
<script>
  SkivPlayer({
    container: '#video-player',
    video: 'y8zH87z',
    links: false,
    logo: 'https://example.com/your-logo.png',
    autoplay: true,
    volume: 0,
    css: '.player-title{color:#fe4900!important;} ...'
  });
</script>
Player with ads (JS)
<div id="video-player"></div>
<script src="https://skiv.com/static/js/embed-player.min.js"></script>
<script>
  SkivPlayer({
    container: '#video-player',
    video: 'RgLyiLG',
    autoplay: true,
    volume: 0,
    ad: [
      'https://muse.advertserve.com/servlet/vast3/media?mid=2&pid=auto&random=12345',
    ],
  });
</script>
No user controls (iframe)
<iframe src="https://skiv.com/embed/sLFaX4p?links=0&autoplay=1&volume=0&style=no-controls"
width="576" height="324" frameborder="0" allowfullscreen></iframe>Player integrations
Embed in Wordpress

The standard embed code works on Wordpress. For hosts that block custom scripts, check Use iframe in the embed modal for an iframe version.
- Go to the Page or Post in which you want to embed the video
- Type / or click the add icon
- Select the Custom HTML block
- Paste your embed code
The Skiv WordPress plugin is also available on the WordPress directory, or download it directly. It converts pasted video links into embeds and adds shortcodes.
Some WordPress hosts charge extra for embedding. Self-host to avoid that fee.
Embed in Squarespace

The Squarespace free plan only accepts iframe embeds. Check Use iframe in the embed modal. Paid plans also support the standard embed code.
- Go to the Page in which you want to embed the video
- Click Edit
- Click the add icon at the top of each section
- Select the Code block
- Replace the placeholder content with your embed code
- Click Apply
Embed in Wix

- Go to the Page in which you want to embed the video
- Click the add icon on the left
- In the pop-up menu, select Embed > Custom Embeds > Embed a Widget
- Click Enter code, above the new block
- Replace the placeholder content with your embed code
- Paste your code and click Update
- Resize the block to your liking
Embed in Kajabi

- Go to the Page in which you want to embed the video
- On the panel on the left, click Add Content block
- On the panel on the left, click Video Embed block
- Replace the code in the Embed Code box with your own
- Click Save
Embed in MemberVault

- Go to a Lesson page
- Set the Video Type to Other
- Paste your embed code in the Video ID field
- Scroll to the bottom and click Save Lesson
Embedded Player
Drop the Skiv player into any page. Configure it to taste.
Get video embed code
- Select the video
- In the bottom-bar, click Share
- Click the embed icon
- Click Copy to copy the embed code
Set call-to-action screen Plus Plan
- Select the video
- In the bottom-bar, click Share
- Click the embed icon
- Click Advanced embed options
- Scroll to CALL TO ACTION section
- Fill in the input fields
- Click Copy to copy the embed code
Custom usage
Two lines of code get the player on your page:
Standard
<div class="skiv-video-player" data-video="y8zH87z" data-width="600"></div>
<script src="https://skiv.com/static/js/embed-player.min.js"></script>
iframe
<iframe src="https://skiv.com/embed/y8zH87z?start=20&volume=75"
        width="576" height="324" frameborder="0" allowfullscreen></iframe>
For the standard method, set data-video to the video ID (visible in the address bar on Skiv).
Include the <script> tag once per page, ideally in <head> or at the end of <body>.
Set size with data-width or data-height. Default is 640x360.
Standard embed attributes
data-video | Video ID. |
data-width | Player width. Can be provided as pixels (e.g. "560") or a relative value (e.g. "100%"). |
data-height | Player height. Can be provided as pixels (e.g. "560") or a relative value (e.g. "100%"). |
data-autoplay | Set to "1" to play the video automatically. Set to "visible" to play when video enters the viewport. |
data-loop | Set to "1" to restart the video after it finishes. |
data-start | The time at which the video should start playing. |
data-resume | Set to "1" to seek back to the last viewing position when the video loads. |
data-volume | Set volume to a value between 0 and 100. |
data-consent | Set to "1" to indicate the viewer has already given consent to view sensitive content. |
data-share | Set to "1" to show a share icon in the player. |
data-subtitles | Enable subtitles by default, set to "auto" to show automatically generated subtitles, or set to the name of uploaded subtitles. To show the auto-translated subtitles by default, use Chinese, French, German, Portuguese, or Spanish. |
data-shortcuts | Set to "0" to disable keyboard shortcuts. |
data-download | Set to "1" to enable downloads. |
data-controls | Enable or disable player controls. A comma-separated list of controls prepended with plus or minus signs. E.g. "-fullscreen,+subtitles" will show a subtitle toggle and hide the fullscreen toggle. Includes fullscreen, subtitles, volume, settings, chromecast, and airplay. |
data-playlist | Either a collection ID or a comma-separated list of video IDs to play in a sequence. |
data-ld | Set to "0" to disable Linked Data markup. Enabled by default. This helps with SEO. |
data-ad | Include VAST / VPAID / VMAP tags to show your own ads. |
Embedding on Wordpress, Squarespace, or Wix pages? See Player integrations.
Advanced usage
For programmatic control, use the JavaScript library. Create players, wire up events, call methods.
Include the embedded player script, then instantiate:
<div id="your-container"></div>
<script src="https://skiv.com/static/js/embed-player.min.js"></script>
<script>
  const player = SkivPlayer({
    container: '#your-container',
    video: 'y8zH87z',
    width: 400
  });
</script>
The returned player object exposes playback controls. Pause the video with player.pause().
SkivPlayer parameters
container | HTML element that will contain the player. |
autoplay | Set to true to play the video automatically. Set to 'visible' to play when video enters the viewport. |
loop | Set to true to restart the video after it finishes. |
start | Time at which the video should start playing. |
resume | Set to true to seek back to the last viewing position when the video loads. |
volume | Set volume to a value between 0 and 100. |
width | Desired player width. Can be provided as an integer (in pixels) or a relative value as a string (e.g. '100%'). |
height | Desired player height. Can be provided as an integer (in pixels) or a relative value as a string (e.g. '100%'). |
title | Set to false to hide the title. |
search | Set to false to hide the search functionality. |
links | Set to false to disable links to Skiv. |
sizing | Set to 'fill' to fill the entire container's size and introduce black bars as necessary. Set to 'fit' to span the parent container while maintaining the player's aspect ratio. Set to 'cover' to span the parent container disregarding the player's aspect ratio. When using these values make sure that the container's parent has explicit width and height that don't depend on the player. If sizing is set, width and height will be ignored. Default: null. |
logo | Set to false to hide branding on the player. |
style | Set to minimal for minimal player controls, and to no-controls to hide controls entirely. |
consent | Set to true to indicate the viewer has already given consent to view sensitive content. |
linkedData | Set to false to disable Linked Data markup. Enabled by default. |
share | Set to true to show a share icon in the player. |
subtitles | Enable subtitles by default, set to 'auto' to show automatically generated subtitles, or set to the name of uploaded subtitles. |
shortcuts | Set to false to disable keyboard shortcuts. |
download | Set to true to enable downloads. |
controls | Enable or disable player controls. A list of control names prepended with plus or minus signs. E.g. ["-fullscreen", "+subtitles"] will show a subtitle toggle and hide the fullscreen toggle. |
playlist | Either a collection ID or a list of video IDs to play in a sequence. |
ad | Include VAST / VPAID / VMAP tags to show your own ads. |
SkivPlayer methods
play() | Play the video. |
pause() | Pause the video. |
seek(time) | Skip to the specified time. |
search(query, seek) | Search using the provided query. Set the seek argument to true to seek the video to the first result after performing the search. |
on(event, listener) | Set up a function that will be called when the specified event happens. |
off(event, listener) | Remove a previously set up event listener. |
setVideo(video) | Load the video into the player from the given video ID. |
setSpeed(rate) | Set the rate at which to play the video. |
setVolume(volume) | Set volume to a value between 0 and 100. |
SkivPlayer events
play | Video is playing. |
pause | Video is paused. |
ended | Video has ended. |
metadata | Player metadata (such as title, description, width, and height) is ready. The metadata object will be passed to the listener as the first argument. |
timeupdate | Event fired when the playback time of the player changes. The current playback time in seconds will be passed to the listener as the first argument. |
search | A search is performed. The query string will be passed as the first argument. |
speed | Playback speed changed. The new speed is passed as the only argument. |
For example:
player.on('metadata', metadata => {
  document.getElementById('video-title').innerText = metadata.title;
  document.getElementById('video-description').innerText = metadata.description;
});
Embedding video data
Embed video metadata — description, transcript, detected text — directly on your page. Renders full video pages and powers search engine optimization for video.
<div class="skiv-video-data" data-video="FTBViRx" data-content="description"></div>
<script src="https://skiv.com/static/js/embed-player.min.js"></script>
Skip the <script> line if it's already on the page.
Possible data-content values
description | Video description. |
speech | Video transcript. |
objects | A list of detected objects that appear in the video. |
scenes | A list of distinct scenes in the video. |
sounds | A list of distinct sounds in the video. |
text | A list of detected words that appear in the video as printed text. |
actions | A list of distinct actions in the video. |
Embedded Collections
Put Skiv's video search on any site. Visitors browse your collection and find the exact moments they need.
Get embed code
- Open Collections in the sidebar
- Click the Collection you want to embed
- In topbar, click Share
- Click the Embed icon
- Click Copy to copy the embed code
Advanced usage
Add video search via the JavaScript library.
Load the library:
<script src="https://skiv.com/static/js/embed-search.min.js"></script>
Declare the search and video grid containers:
<div id="muse-search"></div>
<div id="muse-videos-grid"></div>
Initialize SkivCollection with your layout:
<script>
  SkivCollection({
    collection: 'TmB8Lt7',
    containerInput: '#muse-search',
    containerResults: '#muse-videos-grid'
  });
</script>
SkivCollection parameters
collection string *Collection ID of the video collection you want to embed. You can find it in the URL of a collection.
containerResults string *Selector for the video grid container. This also shows search results.
containerInput stringSelector for the search container.
containerPlayer stringOptional player selector for where the video will appear after user clicks one of the search results. If this value is not provided, clicking a result will display the video in a lightbox. Ignored when player parameter is provided.
playerOptions objectPlayer options to be applied when using the default player. Ignored when player parameter is provided. See player documentation for available options.
player SkivPlayerWhen provided, instead of using the default player, use this player to play collection's videos.
style stringThumbnail style for video listing. Possible values: tiny, small, large, detailed. Default: small.
layout stringLayout of video listing. Possible values: grid, horizontal. Tip: to achieve a vertical listing, set to grid and limit the container width to 200-300 pixels in CSS. Default: grid.
sort stringVideo order. Some possible values: title, uploaded (time when video was uploaded), added (time when video was added to collection), views (number of views). Prepend - to indicate descending order. Default: -uploaded.
toolbar boolSet this to false to hide the toolbar with search result summary and search result volume control.
cssDefault boolSet this to false to not apply the default search result and input field styling. You will need to style it yourself.
* required
SkivCollection methods
setCollection(collection) | Load the collection specified by the ID. |
on(event, listener) | Set up a function that will be called when the specified event happens. |
off(event, listener) | Remove a previously set up event listener. |
SkivCollection events
metadata | Collection metadata (such as name, description, videos contained) is ready. The metadata object will be passed to the listener as the first argument. |
select | A video is selected by the user and is about to be played. Video metadata will be passed to the listener as the first argument. |
Video Pages
Drop-in, responsive HTML templates. Download a page, host it yourself.
Centered video
Video centered vertically and horizontally.
<div class="container">
  <div id="video-player"></div>
</div>
<script src="https://skiv.com/static/js/embed-player.min.js"></script>
<script>
  const player = SkivPlayer({
    container: document.getElementById('video-player'),
    video: 'sLFaX4p',
    autoplay: true,
    loop: true,
    volume: 0,
    sizing: 'fit',
  });
</script>
Video + title + description
Video with title and description, centered horizontally.
<div class="container">
  <h1 id="video-title"></h1>
  <div id="video-player"></div>
  <h2 id="video-description"></h2>
</div>
<script src="https://skiv.com/static/js/embed-player.min.js"></script>
<script>
  const player = SkivPlayer({
    container: '#video-player',
    video: 'sLFaX4p',
    autoplay: true,
    loop: true,
    volume: 0,
    width: 'parent',
  });
  player.on('metadata', metadata => {
    document.getElementById('video-title').innerText = metadata.title;
    document.getElementById('video-description').innerText = metadata.description;
  });
</script>
Video + interactive transcript
Two-pane layout: video alongside its auto-generated, clickable transcript.
<div id="container-video" class="container">
  <h1 id="video-title"></h1>
  <div id="video-player"></div>
  <h2 id="video-description"></h2>
</div>
<div class="container-transcript">
  <div class="header-transcript">
    <h2>Transcript</h2>
  </div>
  <div id="transcript-list">
    <table><tbody id="speech-container"></tbody></table>
  </div>
</div>

<script src="https://skiv.com/static/js/embed-player.min.js"></script>
<script>
  const svid = 'VBdrD8v';
  const player = SkivPlayer({
    container: '#video-player',
    video: svid,
    width: 'parent',
    showTitle: false,
  });

  player.on('metadata', metadata => {
    document.getElementById('video-title').innerText = metadata.title;
    document.getElementById('video-description').innerText = metadata.description;
  });

  // Highlight the current word.
  player.on('timeupdate', function(time) {
    document.querySelectorAll('.word').forEach(function(word) {
      if (parseFloat(word.dataset.start) <= time &&
          parseFloat(word.dataset.end) > time) {
        word.classList.add('current');
        word.scrollIntoView({behavior: "smooth", block: "center"});
      } else {
        word.classList.remove('current');
      }
    });
  });

  // Fetch words and render as phrases.
  fetch(SKIV_LIB.apiOrigin() + '/api/files/i/speech/' + svid, {mode: 'cors'})
    .then(r => r.json())
    .then(words => {
      words.sort((a, b) => a[0] - b[0]);
      // Group into phrases and render...
    });

  // On word click, seek to that time.
  document.addEventListener('click', e => {
    if (e.target.classList.contains('word')) {
      player.seek(parseFloat(e.target.dataset.start));
      player.play();
    }
  });
</script>
Video + interactive chapters
Two-pane layout with clickable chapters for navigation.
<div class="container">
  <div id="video-player"></div>
</div>
<div class="container-chapters">
  <div class="header-chapters">
    <h2>Moments</h2>
  </div>
  <div id="container-list">
    <ol>
      <li data-start="0.0">Moment One     (0s)</li>
      <li data-start="2.5">Moment Two   (2.5s)</li>
      <li data-start="9.7">Moment three (9.7s)</li>
    </ol>
  </div>
</div>
<script src="https://skiv.com/static/js/embed-player.min.js"></script>
<script>
  const player = SkivPlayer({
    container: '#video-player',
    video: 'sLFaX4p',
    autoplay: true,
    loop: true,
    volume: 0,
    width: 'parent',
  });
  document.querySelectorAll('#container-list li').forEach(li => {
    li.addEventListener('click', e => {
      player.seek(parseFloat(e.currentTarget.dataset.start));
    });
  });
</script>
Video list
One player, multiple videos by ID. The videos don't need to share a collection.
<div id="skiv-video-player" data-width="900"></div>
<div id="vgrid"></div>
<script src="https://skiv.com/static/js/embed-player.min.js"></script>
<script>
  const player = SkivPlayer({
    container: '#skiv-video-player',
    video: 'R7c1PrQ',
    sizing: 'fill',
  });

  function MuseList(vlist) {
    vlist.map(x => {
      fetch(SKIV_LIB.apiOrigin() + '/api/files/info/' + x)
        .then(resp => resp.json())
        .then(jdata => {
          var img = document.createElement("img");
          img.src = new URL('thumbnails/thumbnail.jpg', jdata.url);
          img.onclick = function () {
            if (player.options.video === jdata.svid) {
              player.play();
            } else {
              player.setVideo(jdata.svid);
            }
          };
          document.getElementById('vgrid').appendChild(img);
        });
    });
  }

  var vlist = ['R7c1PrQ', 'cABMGwV', 'x41yzAr', 'PdPox4y', '9Hdap75'];
  MuseList(vlist);
</script>Zoom integration
Send Zoom cloud recordings to your Skiv library automatically.
Auto-upload Zoom cloud recordings to Skiv

Connect Zoom to Skiv with Zapier. The Zapier listing still uses our former name, muse.ai.
- Make sure your Zoom plan includes Cloud Recording (Pro, Business, Education, or Enterprise)
- Enable Cloud Recording in Zoom
- Go to your Zoom Recording Settings and enable Cloud Recording under the Recording & Transcript tab
- Enable Automatic Recording if you want every meeting saved without prompting
- Sign in to Zapier
- Open the Zoom to muse.ai Zap template
- When Zapier asks for your Skiv API key, open Settings > API Keys in Skiv, create a key, and paste it into Zapier
- Authorize both integrations when prompted; you must connect an active Zoom account and a Skiv account
- Turn on the Zap. New Zoom cloud recordings will upload to your Skiv library
FAQ
No hard cap. Skiv operates on a fair-use policy. If usage gets high enough to affect your viewers or others, we reach out to find a better plan.
No per-file limit. Total storage is governed by your plan.
Yes. Videos and collections support Private, Unlisted, and Public visibility. The embedded player can also restrict playback to specific domains. How to change visibility.
Any lawful content, provided it does not contain threats against individuals or groups. Offensive content may be flagged and gated behind viewer consent.
Yes. Go to Settings > Plan > Delete and follow the steps.